Stabilizing stuff

Bruno

Administrator
Staff member
I like stabilized materials, but it's not always easy to find the right combination of material, color, and shape. So I have started stabilising materials myself. For now i stick to experimenting with the resin, the dyes, the bones and the vacuum chamber.

20190116_194848.jpg


I plan to use these with some of the blades I have in progress. Already i can see many interesting ways to expand the things i am currently doing with handle material.

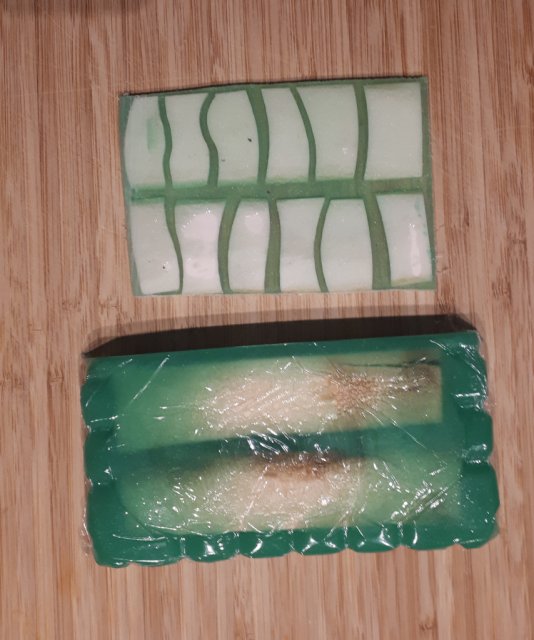
The top piece is going to be a set of scales on a relatively small full tang knife.

The bottom is a set of mammoth tusk ivory scales. I bought it from mermaid supplies. It was a single piece with a crack. And it was curved. I cut it lengthwise and stabilized the pieces lying upside down. This way they will be scales with ivory on the outside and green resin liners. And additional bonus is that I can leave the outside encased in resin until after I drill the holes. That way I have a nice flat stable surface when I drill it.
 

verndahl

AKA tintin
Are these done in a vacuum or is it just resin poured around it in a mold? I'm only familiar with the type of stabilizing that the object retains it's original shape with the pores filled in. Give us a short "how to" if you would.
 
Reactions: 32t

Bruno

Administrator
Staff member
This happens in a vacuum pot. Basically my steps are like this:

1) make sure that the bone is clean and dry. The guy who sold me the material told me to warm it in an oven if you suspect moisute, and then let it cool down to room temp again.
2) put the bone in a mold. You want the mold to be close enough in size that you don't waste a lot of epoxy. Otoh you also want enough in there to impregnate whatever holes and cavities there are when all the air starts coming out.
3) measure the amount of epoxy you want, and mix it with whatever dye or powders you desire.
4) add the hardener and mix it for several minutes until it is mixed homogenous.
5) pour some epoxy, then put the bone in without trapping big pockets of air, and then pour the rest.
6) put everything in the vacuum pot, and make a vacuum.
7) wait until the air has stopped bubbling, and then release the vacuum. This will make the epoxy go into the cavities that might still be vacuum.
8) wait a couple of minutes, and then make everything vacuum again.
9) repeat the previous 2 steps a couple of times if you still see a lot of air coming out.
10) close the valves, turn off the pump, and let it sit for a couple of hours until the epoxy has started to cure.
11) take everything out, and wait a couple of days for the curing process to be fully finished. After 24 hours it will be solid. After 48 hours it will be hard, and after 72 hours it should be as hard as it is going to get.

This process works for pieces where you want the resin to be part of the piece to fill in missing pieces or to have an epoxy liner or body like my test pieces above.
The guy I buy most handle materials from tells me that if you want to stabilize longer pieces of bones and you only want to fill cracks and the inside, the process is a bit different.
Then you would have a container of epoxy in the chamber, dunk the piece, and make a vacuum. When all the air is gone, take out the piece and immediately wrap it tightly in aluminium so that nothing can leak out, and put it in a low temp oven to cure. This way you can do a lot of pieces with the minimum of stabilizing agent.

He also told me that you can use acrylic based stabilizing agents but I haven't used those yet.
He also told me that instead of vacuum you can use pressure, but that can be dangerous (compressed air on large chamber surfaces).
 

Bruno

Administrator
Staff member
I made a bit too much resin to be honest. I didn't estimate it correctly.
The mammoth pieces are curved, and the resin is going to be line a liner that also happens to fit the inside hollow of the mammoth perfectly.
The pieces with the bone are just test pieces. if this is solid and strong enough I may make razor scales like that.
 

Bruno

Administrator
Staff member
I just checked, and the resin is now bone hard. Harder than some of the resins I found in commercial hybrids. I can't even scratch it anymore so I am a very happy camper. Now I make some nice knife handles as well as just scales with lines like this.
I was worried for a bit because yesterday it was still soft enough to scratch it with my fingernail but it really took 72 hours as described.
 

Bruno

Administrator
Staff member
Good! I made a couple more things I'll be showing pics of.
It is fairly easy to do. The trickiest things are a) making a mold that is big enough to fit, and small enough to not waste a lot of resin. and b) keeping small things from moving.
 

Substance

New Member
My limited knowledge is stabilising is done under vacuum ( I use cactus juice ), but resin casting is done under pressure or nothing
For stabilising dry wood or base material is eccential, I bake woods etc in a small oven @ 70c for about 24hrs, then let cool in ziplock air light bags until ready to use,
Mix your choice of comparable dyes with the stabilising resin,
and place base and resin in vacuum,
keep items at vacuum u til all bubbles stop,
this can be a couple of days depending on the density of the base materials,
when bubbles stop remove vacuum,
( if you have pressure this can be used now also ), and leave for at least the same amount of time as the vacuum was held to ensure full empregnation of the resin,
then remove wrap in foil and bake at 50-70c for 5 hours ( this is for 35x50x150mm blocks) then all good to go,
The fouls is purely for catching any leaking resin the cooler the better to prevent resin being pushed out,

Resin casting on the other hand is a different kettle of fish,
I have only made pure resin slabs & paper & cloth type micarta slabs, these have not been done under vacuum or pressure & just at atmosphere or clamped for micarta

My casting resin goes off in about 20 minutes at 28c here
I have plans to try the casting in the vacuum with some termite eaten wood I stabilised to see if it works and can pull into the voids better with out having to slab the blocks first
 

Bruno

Administrator
Staff member
When working with resin, it is correct that you'd need porous / cracked material.
That's also why I don't take the material out to wrap it in foil. It would be impossible to keep the resin from simply leaking out.
You are correct that resin is for casting, but if the material is porous, it can double as stabilizing.
 

Bruno

Administrator
Staff member
Btw, if you have porous material that is thick, try to place it so that the air has a natural way out by rising.
And you might get better results if you release the vacuum a couple of times. that way any remaining vacuum will suck in resin.
 

geezer

Member
FWW, Som stabilising resins work best with greener woods. Some work poorly with very dry materials. MAnufactrers' information is a definite read!

YMMV
~Richard
 

Bruno

Administrator
Staff member
The resin was hard enough to get rid of the excess and get an idea of the final result. It is still coarse looking and the colors are still looking rough too.

Resin colors only come out during polish. And this is essentially a very wasteful process since most of the resin is ground away again. But the results are beautiful so that makes it worth it.
949


950
 

verndahl

AKA tintin
Yeah, that is neat! i was having a hard time picturing what you had in mind when i saw the "before" pictures.
 
Top